
This is Part 2 of our article on how to tweak BLT so that it can work with Pantheon. If you want more information about BLT, Pantheon, and our setup, go to How to Set Up BLT and GitLab CI to Work with Pantheon Hosting (Part 1). In this part of the article, we'll go into the details of setting up the CI/CD system in a Drupal project with BLT and GitLab CI.
Part 2: Use BLT with Pantheon
We'll set up a development workflow with:
- BLT: a suite of tools that wraps around your Drupal project
- GitLab CI: the pipeline to validate and build artifacts
- Pantheon: hosts the Drupal site
In this tutorial, we'll set up a Drupal website with the name drupal-books-api.
The Setup
0. Create the project on Pantheon
Create the Drupal project on Pantheon, then switch into Git and collect the Git URL.
1. Create project with BLT
On your computer, create the project by running
composer create-project --no-interaction acquia/blt-project drupal-books-apiOpen the file blt/blt.yml and update git.remotes with the Git URL
git:
   default_branch: master
   remotes:
      - ssh://codeserver.dev.xxxxxxxxxxxxxxxxxxxx@codeserver.dev.xxxxxxxxxxxxxxxx.drush.in:2222/~/repository.git
2. Add GitLab CI
GitLab CI, by its name, is a service from GitLab that integrates CI/CD pipelines to help build, test and deploy applications.
We'll start by adding the file name .gitlab-ci.yml into the project's root.
## 1. use docker image composer
image: composer

## 2. define custom variables
variables:
    BLT: ./vendor/bin/blt

## 3. cache, reused packages fetched from previous job
cache:
    paths:
        - $HOME/.npm
        - $HOME/.nvm
        - vendor
        - docroot/core
        - docroot/modules/contrib
        - docroot/themes/contrib
        - docroot/profiles/contrib
        - docroot/libraries

## 4. additional setup, prior to running the main tasks
before_script:
    # Setup SSH key to push artifact to deploy to server
    - mkdir -p ~/.ssh
    - eval $(ssh-agent -s)
    - echo -e "Host *\n\tStrictHostKeyChecking no\n\n" > ~/.ssh/config
    - echo "$DEPLOY_PRIVATE_KEY" > ~/.ssh/id_rsa && chmod 0600 ~/.ssh/id_rsa
    - ssh-add ~/.ssh/id_rsa
    # Install rsync as needed by BLT
    - apk add rsync --no-cache

## 5. define stages
stages:
    - validate
    - build_deploy

## 6. stage validate
validate:
    stage: validate
    script:
        # Install required dependencies using composer
        - composer install --ignore-platform-reqs
        # Validate composer, phpcs ...
        - $BLT validate

## 7. state build and deploy
build_deploy:
    stage: build_deploy
    only:
        - master
    script:
        - $BLT artifact:deploy --commit-msg "$CI_COMMIT_TITLE" --branch "master" --ignore-dirty --ignore-platform-reqs --no-interaction --verbose
Explanations:
1. Use Docker image composer: This defines the Docker image that the executor will run to perform CI tasks. This setup uses the composer image. If your CI/CD pipeline has specific requirements, e.g. a specific PHP version, you can always find another prebuilt Docker image from DockerHub. Or if none suits your purpose, you can create and push a custom Docker image for your team.
2. Define custom variables: These variables will later be used during the run of CI tasks. In this example, we defined a variable named BLT which equals to ./vendor/bin/blt. Then in step 6, $BLT validate simply means running script ./vendor/bin/blt validate.
3. Cache: Cache the downloaded dependencies so that in the next stage, it doesn't have to download them again from the Internet. This helps speed up the running time of the jobs.
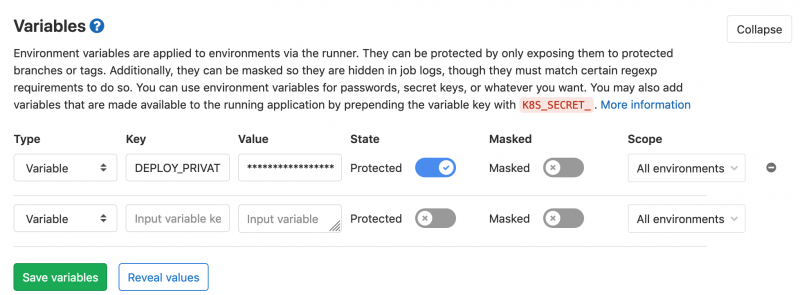
4. Before script: the additional tasks to run prior to the main tasks. At the end of the build process, we want GitLab CI to push the latest version to Pantheon. As in the first step, we defined Pantheon to accept Git push via SSH protocol, so we need the container where GitLab CI is running our tasks to be able to identify itself with Pantheon. In this step, we simply create a SSH key ~/.ssh/id_rsa with content from $DEPLOY_PRIVATE_KEY. $DEPLOY_PRIVATE_KEY is a predefined environment variable that we set up in our GitLab project by going to GitLab > Your Project > Settings > CI/CD > Variables.
The value of DEPLOY_PRIVATE_KEY is the private key, which can be retrieved by
pbcopy < ~/.ssh/id_rsa
// Then paste it into CI/CD variables
Or if you don't have pbcopy, simply copy the contents of ~/.ssh/id_rsa
Note 1: Make sure that the SSH key id_rsa.pub is added to your Pantheon account, otherwise the Pantheon server has no idea who is pushing code.
Note 2: It's a good practice to set up a separate SSH key for deployment for each team.
5. Define stages: Define how many stages you should have in your pipeline. In our simple project, we have two stages: validate code and build the artifact, then deploy it.
Steps 6 and 7 include tasks to run in each of the stages.
6. Install dependencies and perform validation: Although BLT will run composer install during the process of creating an artifact, this step is required to make sure BLT and its dependencies are present and up-to-date before running any BLT commands afterward. $BLT validate runs a group of commands below:
blt tests:composer:validate
blt tests:php:lint
blt tests:phpcs:sniff:all
blt tests:yaml:lint:all
blt tests:twig:lint:all
7. Build the artifact and deploy to Pantheon's server: If all is good, GitLab CI jumps to the second stage by running the command
blt artifact:deploy
  --commit-msg "$CI_COMMIT_TITLE"
  --branch "master"
  --ignore-dirty
  --ignore-platform-reqs
  --no-interaction --verbose
This will create an artifact, then push it to the branch master of the remotes defined in file blt.yml mentioned in step 1. At the end of the process, you'll see the commit passed through to Pantheon's dashboard.
Notice that in step 7, there is a declaration of only which accepts master. This means the step build_deploy triggers only when an action is made on the branch master.
Let's say your team follows Gitflow workflow. When a developer pushes the feature branch (feature/00000-change-header-color), GitLab CI should run the validate stage to verify and sniff code, but should not deploy it right away to Pantheon. Instead, the developer would create a Merge Request against master. Once approved, trigger CI to validate again, then build and deploy to Pantheon.
So, with the addition of the file .gitlab-ci.yml, we are able to orchestrate a GitLab CI instance to validate code and push it to Pantheon when things are right.
3. Update settings.php
At this point, we have the CI set up and configured, but that's not enough for our small project to run on Pantheon. We need the database connection.
Drupal projects created by Pantheon come with a modified version of settings.php and an additional file settings.pantheon.php. These files allow your project, when run on Pantheon, to be able to read the database connection from a JSON file located at $_SERVER['PRESSFLOW_SETTINGS'], and use it to connect your Drupal site to the correct database.
A project created with BLT doesn't come with this setup by default, so we need to update settings.php and settings.pantheon.php from the Pantheon repo.
Note: Make sure to have hash_salt in your settings.php
$settings['hash_salt'] = '41kFdvIe95v0tbqQWoxxxxxxxxxxxxxxxxxxxxxxxxxxxxxxx-JJwoEW4iQeHer-wkMB3rgAXkVFQ';4. Add the pantheon.yml file
While Acquia prefers to put Drupal code in the docroot directory, Pantheon nests docroot in a directory called web. So we need to add the final tweak—add the file pantheon.yml to the project root:
# Put overrides to your pantheon.upstream.yml file here.
# For more information, see: https://pantheon.io/docs/pantheon-yml/
api_version: 1

# PHP Version:
# https://pantheon.io/docs/pantheon-yml#php-version
# Set site's PHP version to 7.2
php_version: 7.2

# Nested Docroot
# https://pantheon.io/docs/pantheon-yml#nested-docroot
web_docroot: true
If your project doesn't have this file, Pantheon will create one. Since we want to specify web_docroot: true, creating a pantheon.yml tells Pantheon not to overwrite our custom setup.
And lastly, we need a symlink
ln -s docroot/ webNow, commit the changes to GitLab and wait for the green check marks in GitLab CI/CD > Pipelines.
Where to Go From Here
Now that everything is in place, development workflows in teams are simpler and more manageable:
- Developers can just worry about their code and dependencies, not the deployment. With BLT and GitLab CI, only SASS files make their way to the Git repo, so there's no more resolving of CSS conflicts, no more commits of type "Recompile CSS"
- Vendor/, core/, modules/contrib/, libraries/ can be excluded from the Git repo
- Deployment is more consistent as the build process runs through the same list of predefined tasks
A more complex setup can include:
- Custom Docker image to run GitLab CI tasks
- More code validating
- Automated testing
- Complex approval process
- Post deployment notifications
This is one way to make BLT work with Pantheon. Let us know if you have comments or questions!