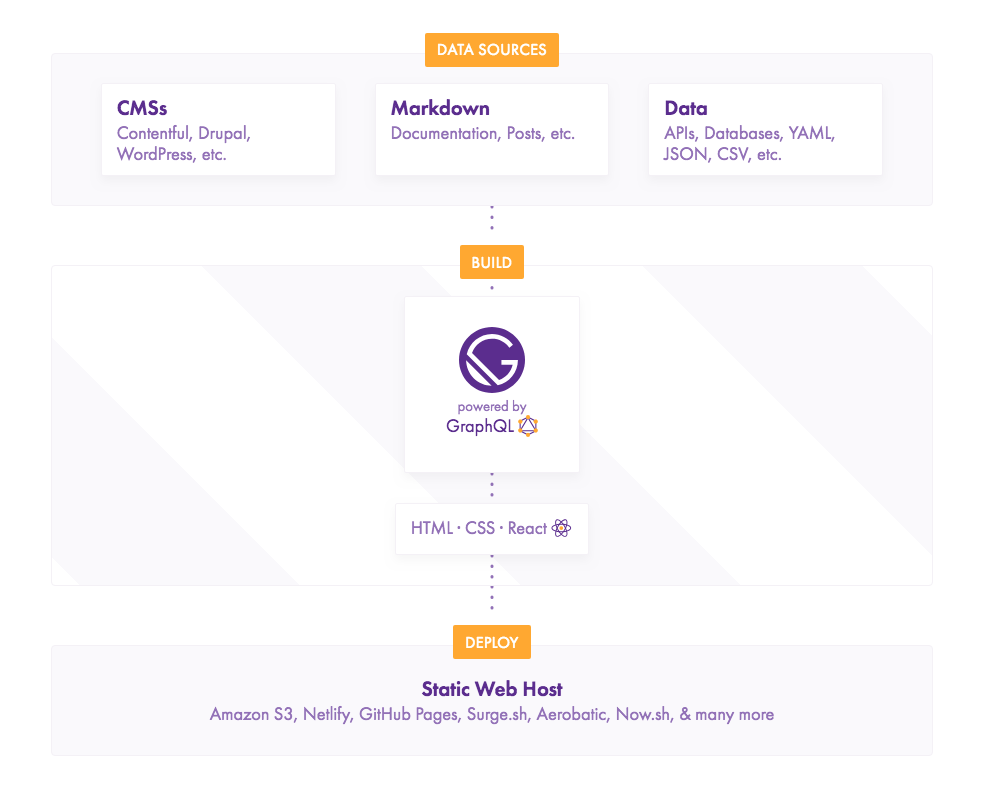
Gatsby is a really fast React-based static site generator. You can use it to create a static site, with content pulled from Drupal and other content management systems.
Why Use Gatsby?
Unlike dynamic sites which render pages on-demand, static site generators pre-generate all the pages of the website. This means no more live database querying and no more running through a template engine. Performance goes up and the maintenance cost goes down.
Static site generators have been evolving over the last few years. Tools like Jekyll, Gatsby, Hexo, Hugo become more and more popular. They have been chosen by developers who want a simple website/blog solution. They need very minimal server setup and have a low maintenance cost. However, static site generators usually require writing content in Markdown, which is not a great authoring experience for most content editors.
On the other hand, content management systems such as Drupal and Wordpress can provide a very powerful back-end. Having a WYSIWYG editor and content types help editors to manage content more easily and systematically. However, maintaining a CMS requires hosting a web server and database, and opens you up to security vulnerabilities and performance issues.
Gatsby stands in between the simplicity and robustness of static site, and the versatile back-end of a content management system. Using Gatsby means that you can host the CMS in-house and publish content generated by Gatsby as a static website. The first thing you’ll notice about Gatsby is how amazingly fast it is.
How to Integrate Drupal and Gatsby
In this tutorial, we are going to put together a demo that pulls Drupal content into a Gatsby site. We’ll borrow content of this awesome blog post to create a list of coffee types in Drupal, then transfer the list content to Gatsby.
This goal can be achieved with 4 steps:
- Build a Drupal server
- Build a Gatsby site
- Fetch content from the Drupal server
- Publish the Gatsby site
1. Build a Drupal server
Let’s say we already have a Drupal site installed. We’ll need to:
- Create a content type name Coffee with three fields: Title, Body and Image

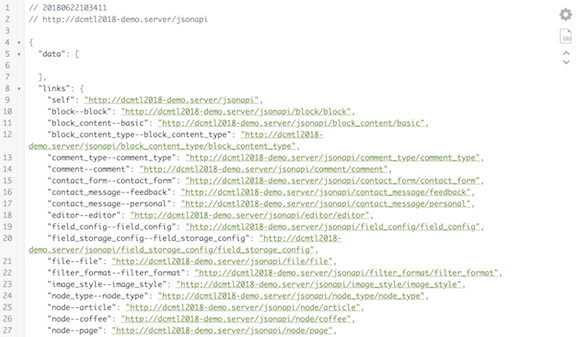
- Turn Drupal into an API server by installing 2 modules jsonapi and jsonapi_extras.
jsonapimodule turns Drupal site into an API server with default endpoint./jsonapi.jsonapi_extrasmodule provides more control over the API such as: changing default endpoint, disable resources, disable fields or enhancing field output. - Give Anonymous user permission to Access the JSON API resource list

- Verify that the API server is working well by going to http://[your-site]/jsonapi as an Anonymous user. The page should show up with all information of your API server
Tips
- If you use Chrome, use JSON Viewer Chrome extension to view JSON data in a better format
- If you don’t set permission for Anonymous user to Access JSON API resource list, you’ll get error 406 - Not acceptable when trying to connect to Drupal from Gatsby
- If you don’t have
jsonapi_extrasinstalled, you’ll get error 405 - Method Not Allowed when query data from Gatsby
2. Build a Gatsby Site
First, make sure you have node and npm installed on your computer. Verify it by typing node -v and npm -v into Terminal
node -v
v10.1.0
npm -v
5.6.0
Install Gatsby’s command line tool
npm install --global gatsby-cliCreate a new Gatsby site and run it, I’ll call my Gatsby site coffees.gatsby
gatsby new coffees.gatsby
cd coffees.gatsby
gatsby develop // start hot-reloading development environment
By default, the new Gatsby site is accessible at localhost:8000

3. Fetch Content from the Drupal Server
At this step, we’ll be creating a new simple page /coffees that displays all the coffee types from the Drupal site.
Create the /coffees page
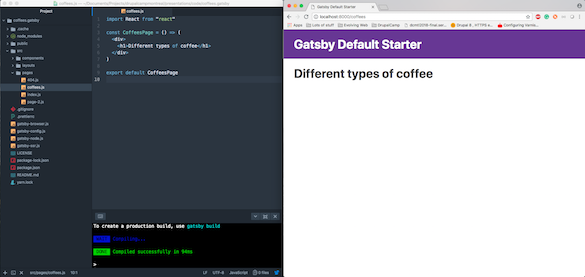
Create a new page in Gatsby is as simple as creating a new JS file. All Gatsby pages should be stored in /src/pages. In this case, we’ll create the file coffees.js in /src/pages and add the following code in coffees.js:
import React from "react"
const CoffeesPage = () => (
  <div>
    <h1>Different types of coffee</h1>
  </div>
)
export default CoffeesPage
This simple code does one thing: create a new page at /coffees. The content of this page is a heading h1 with the text “Different types of coffee”
Query Drupal content using GraphQL
In order to pull data from Drupal site, we’ll need to install the gatsby-source-drupal plugin
// in your coffees.gatsby folder
npm install --save gatsby-source-drupal
Configure the gatsby-source-drupal plugin
// In gatsby-config.js
plugins: [
  ...
  {
    resolve: 'gatsby-source-drupal',
    options: {
      baseUrl: 'http://dcmtl2018-demo.server/',
      apiBase: 'jsonapi', // endpoint of Drupal server
    },
  }
],
After adding the plugin configuration, the site should still be functioning. If Gatsby throws a 406 error, check the permission on the Drupal site; if Gatsby throws a 405 error, make sure module jsonapi_extras is enabled.
Build GraphQL to query all coffee nodes from Drupal
So far, we used jsonapi module to expose Drupal content via default endpoint /jsonapi. Then we used gatsby_source_drupal plugin to read Drupal content from that endpoint. Now we'll use GraphQL to talk to Drupal, asking for the specific pieces of content that we need.
GraphQL, provided by Gatsby, is a query language (the QL part of its name) works in a very similar way of SQL. It's the way to request a specific data set from the server, using a special syntax.
Gatsby comes with an in-browser tool for writing, validating and testing GraphQL queries named GraphiQL, and it can be found at localhost:[port]/___graphql, in our case it’s localhost:8000/___graphql
Let’s try querying all the Coffee nodes in this tutorial
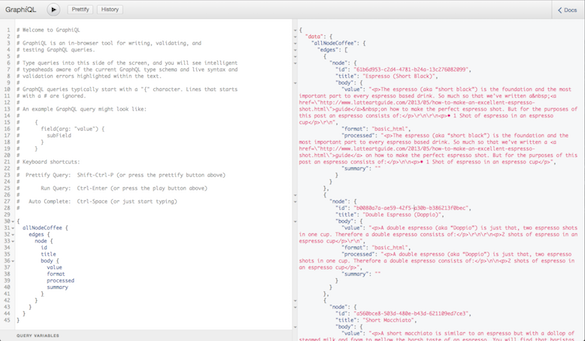
After building the query successfully, let’s go back to the coffees.js file to execute the query.
export const query = graphql`
  query allNodeCoffee {
    allNodeCoffee {
      edges {
        node {
          id
          title
          body {
            value
            format
            processed
            summary
          }
        }
      }
    }
  }
`
Then, update the const CoffeesPage to display the title and body content:
const CoffeesPage = ({data}) => (
  <div>
    <h1>Different types of coffee</h1>
    { data.allNodeCoffee.edges.map(({ node }) => (
      <div>
        <h3>{ node.title }</h3>
        <div dangerouslySetInnerHTML={{ __html: node.body.value }} />
      </div>
    ))}
  </div>
)
Thanks to hot-reloading, we can see the sweet fruit of the work right after saving the file
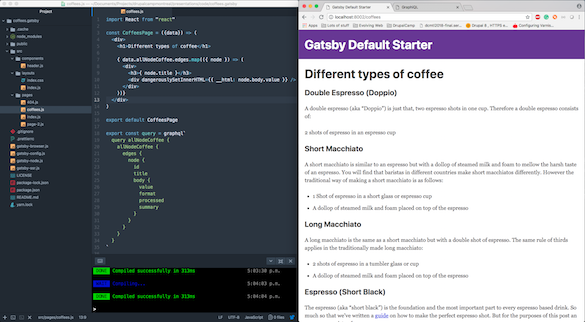
So far, we have done:
- Create an API server with Drupal and
jsonapi,jsonapi_extras - Create a Gatsby site with page
coffees.jsthat “reads” content from Drupal server
Let’s move the the last step of the tutorial: publish Gatsby site.
4. Publish the Gatsby Site
Gatsby names itself as a static static site generator, meaning its main purpose is to generate a bunch of static HTML, JS, CSS and images files. This action can be done by only one command:
gatsby buildOnce finished, checkout /public folder to see result of your hard work along this long tutorial. Deploying your site is now simply copy/push contents in /public to server.
Conclusion
In this tutorial, we got to know how to:
- Create a new Gatsby site
- Install new plugin in Gatsby
- Use GraphiQL to write, validate and test GraphQL query
I personally find that Gatsby is a good solution for setting up a simple blog. It’s easy to install, very fast, and requires zero server maintenance. In a future blog post, I’ll talk about how to integrate more complex data from Drupal into Gatsby.

