
Web developers can revolutionize the way they approach testing and deployment in React Native projects by using Jest, a powerful JavaScript testing framework, and GitLab CI/CD’s automation tool.
In this guide, you’ll find step-by-step instructions to help you initialize a React Native project, set up Jest and React Native Testing Library, and automate tests with Jest in GitLab CI/CD.
Getting Started with React Native
Step 1: Install React Native CLI
If you haven't already, install the React Native CLI globally:
npm install -g react-native-cliStep 2: Create a New React Native Project
Create a new React Native project with the following command:
npx react-native init MyAwesomeAppReplace "MyAwesomeApp" with the desired name of your project.
Step 3: Navigate to the Project Directory
cd MyAwesomeAppStep 4: Run the App on an Emulator or Device
Open a new terminal window and run your app on an emulator or device.
For iOS:
npn run iosFor Android:
npm run androidCongratulations! You've successfully initialized a new React Native project.
An Introduction to Jest & its Benefits
In a moment I’m going to show you how to get started with Jest in React Native. But first, here’s why Jest is our tool of choice:
- Fast and efficient. Jest is known for its speed and efficiency. It can significantly shorten the time it takes to run your test suite, thanks to its intelligent test runner and parallel test execution capabilities. This is particularly crucial in large-scale applications where quick feedback on the health of your codebase is essential.
- Snapshot testing. Jest introduces the concept of snapshot testing, allowing you to capture the output of a component and compare it to a previously saved snapshot. This ensures that UI components remain consistent over time, preventing unintended changes that could lead to bugs.
- Mocking and spying. Jest simplifies the process of mocking dependencies and spying on function calls. This is especially useful when dealing with external APIs, databases, or other complex dependencies. By isolating components during testing, you can identify and fix issues more effectively.
- Built-in code coverage. Jest comes with built-in code coverage reports, allowing you to assess the extent of your test coverage. This feature helps you identify areas of your codebase that may need additional testing. It also ensures that your tests are effectively exercising your application.
Getting Started with Jest in React Native
Jest is usually installed by default when running npxreact-nativeinit. But if it isn’t installed yet, here’s how to do it:
Step 1: Install Jest and Required Packages
npm install --save-dev jest react-test-renderer @babel/preset-env @babel/preset-reactStep 2: Configure Babel
Create a babel.config.js file in the root of your project with the following content:
module.exports = {
  presets: ['module:metro-react-native-babel-preset'],
};
Step 3: Add Jest Configuration
Create a jest.config.js file in the root of your project:
module.exports = {
  preset: 'react-native',
};
Step 4: Update Package.json Scripts
Add the following scripts to your package.json file:
"scripts": {
  "test": "jest",
}
Step 5: Write Your First Test
Create a __tests__ folder in your project and write a test file, for example, App.test.js:
import 'react-native';
import React from 'react';
import App from '../App';
import {expect, it, describe, test} from '@jest/globals';

// test renderer must be required after react-native.
import renderer from 'react-test-renderer';


it('renders correctly', () => {
  renderer.create(<App />);
});
Step 6: Run Your Test
Execute the following command in your terminal:
npm testIf everything is installed correctly, all tests should pass here.
Getting Started with React Testing Library
Now we are going to add something really cool called React Testing Library.
It is important to know that React Testing Library is not the same as Jest, as they have different responsibilities. Jest is a test runner, so it executes the magic of reading all your test files and showing whether something passes or not on the console. For example:
React Testing Library instead provides functionality and utility to test our react native applications. So while Jest collects all test.js files, React Testing Library performs events and accesses our “dom” to test components. Check out this great explanation on Stack Overflow to learn more.
Step 1: Lets install React Testing Library
npm install --save-dev @testing-library/react-nativeStep 2: Create a test using React Testing Library
import 'react-native';
import React from 'react';
import App from '../App';
import {expect, it, describe, test} from '@jest/globals';
// Imports the render function from the '@testing-library/react-native' library.
import { render } from '@testing-library/react-native';
// test renderer must be required after react-native.
import renderer from 'react-test-renderer';
it('renders correctly', () => {
renderer.create(<App />);
});
// Groups several tests the an App block.
describe('App', () => {
// Ensures that the component displays specific text.
test('displays "Read the docs" text', () => {
const { getByText } = render(<SiteCard />);
expect(getByText('Read the docs to discover what to do next:')).toBeTruthy();
});
// Add more tests as needed for other components and functionalities
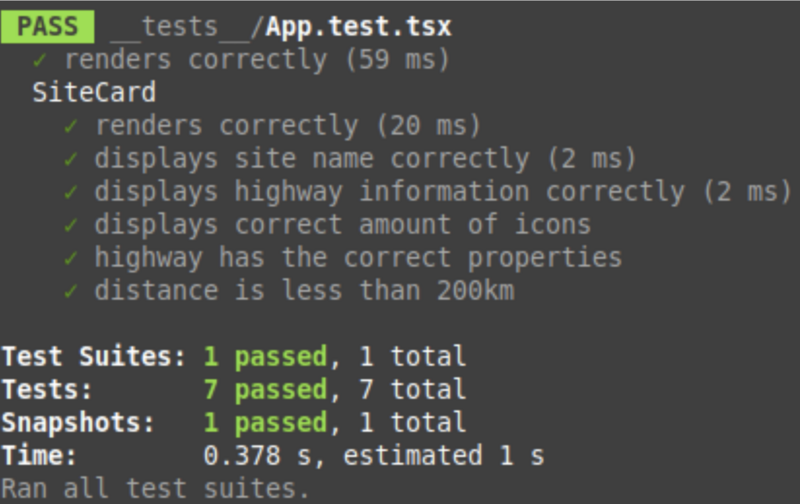
});Now that you have created new tests you can run npm run test again and see all tests you just created for your app.

Automating Tests with Jest in GitLab CI/CD
Step 1: GitLab CI Configuration
Create a .gitlab-ci.yml file in the root of your project to define the CI/CD pipeline configuration. Add the configuration below. This is where we define the stages the pipeline will have and which docker image should it run (in this example it only needs node for our node_modules). It’s also where we run npm install and then run npm run test:
stages:
  - test

unit-test:
  image: node:latest
  stage: test
  before_script:
    - npm install
  script:
    - npm run test
There’s an amazing extra feature that we can add here: reporting and coverage.
Step 1: Implementing jest-junit
We can do this by generating an xml report file using a really simple library called jest-unit.
To install jest-unit, run the following command in your terminal:
npm install --save-dev jest-junitNow, add a new script to run the tests inside of your CI pipeline.
"test:ci": "npm run test -- --testResultsProcessor=\"jest-junit\" --watchAll=false --ci --coverage"Your full package.json file should look like this:
{
  "name": "AwesomeProject",
  "version": "0.0.1",
  "private": true,
  "scripts": {
    "android": "react-native run-android",
    "ios": "react-native run-ios",
    "lint": "eslint .",
    "start": "react-native start",
    "test": "jest",
    "test:ci": "npm run test -- --testResultsProcessor=\"jest-junit\" --watchAll=false --ci --coverage"
  },
  "dependencies": {
    "react": "18.2.0",
    "react-native": "0.73.1"
  },
  "devDependencies": {
    "@babel/core": "^7.20.0",
    "@babel/preset-env": "^7.20.0",
    "@babel/runtime": "^7.20.0",
    "@react-native/babel-preset": "^0.73.18",
    "@react-native/eslint-config": "^0.73.1",
    "@react-native/metro-config": "^0.73.2",
    "@testing-library/react-native": "^12.4.3",
    "@react-native/typescript-config": "^0.73.1",
    "@types/react": "^18.2.6",
    "@types/react-test-renderer": "^18.0.0",
    "babel-jest": "^29.6.3",
    "eslint": "^8.19.0",
    "jest": "^29.6.3",
    "jest-junit": "^16.0.0",
    "prettier": "2.8.8",
    "react-test-renderer": "18.2.0",
    "typescript": "5.0.4"
  },
  "engines": {
    "node": ">=18"
  }
}
Here are some great posts about Gitlab and a complete github action to achieve the same if you want to learn more about CI/CD integration.
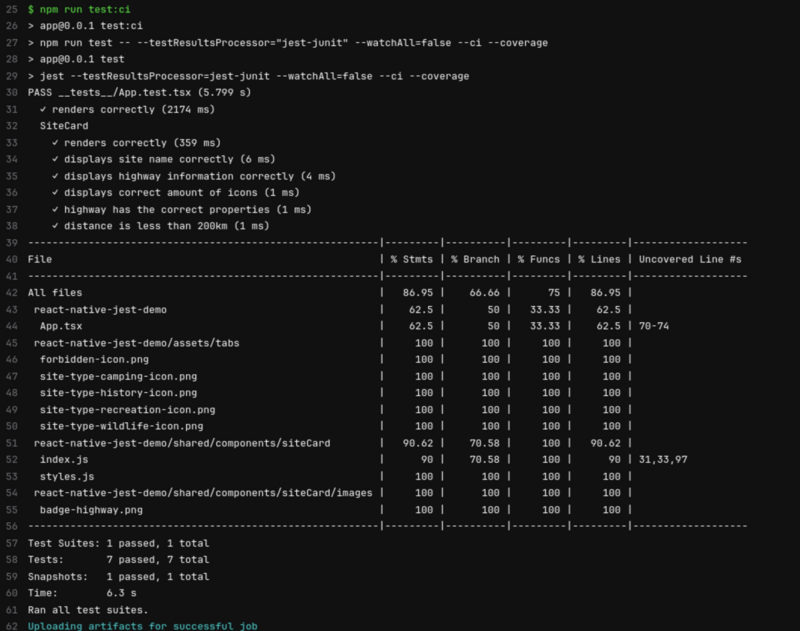
Now that all configuration is done, you can push your codebase to your repo and have a job running for your commit:
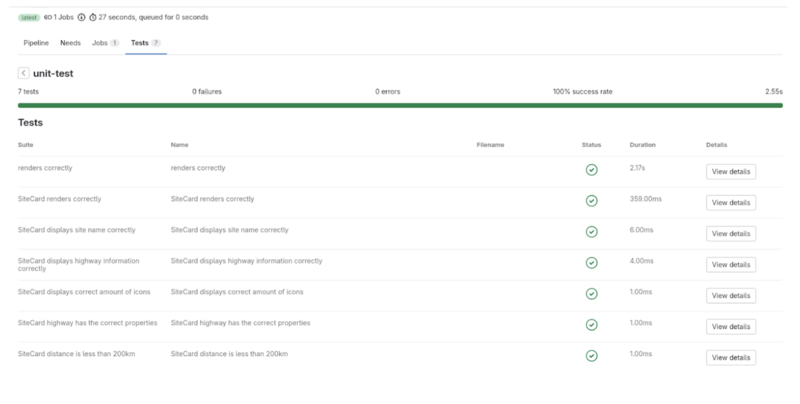
And a report written for the same commit:
And You’re Done!
You now have the knowledge to significantly improve the quality and reliability of your codebase in React Native projects with Jest and GitLab CI/CD. Embracing this powerful combination will enable you to catch issues early, maintain a robust codebase, and deploy with confidence.
Want to learn more from the experts? Explore our training tracks for front-end developers and back-end developers. Get hands-on instruction and actionable insights from experienced trainers.
