Drupal's Field API gives site builders the ability to add arbitrary data types to content types as a field. However, these basic field types are not always enough to store the complex data a site needs to manage. Creating custom fields, widgets, and formatters is a way to go beyond the basic fields given by Drupal.
Recap of Part 1
In part 1 of this tutorial, I covered how to make your own custom field and widget. Here I'll cover how to validate that input and format it using a custom formatter.
So far, we've:
- Created a new field type,
- Created a new field widget,
- Defined the field widget; and
- Defined our
hook_is_empty().
And by the end of this blog post, we'll have:
- Created a validator to detect input errors,
- Defined how our widget should handle any detected errors; and
- Created a formatter to display the saved values.
If you're confused about the terminology, remember this:
- A field is a data type. For example, you could have a colour field that only stores colours.
- A widget is a method of entering data into the field. For example, you could use a colour picker to let users enter colours. Or, you could let the user type the colour name into a textbox.
- A formatter is a way to display the stored field data. For example, you could display a chosen colour by displaying the name of the colour, or an image of that colour.
It's useful to remember that you can define widgets and formatters on existing fields. You can also use existing formatters and widgets for new fields.
The Challenge
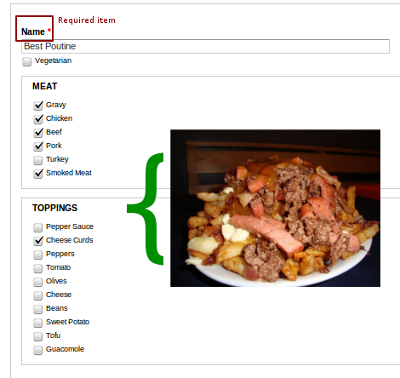
Those who missed the first part of this series will want to know why I'm defining all this custom field stuff. The challenge I gave myself in part 1 was to make a multi-value Poutine Maker field. I wanted people to be able to design their own Poutines, and the poutine_maker module was the result.
Field API Hooks
Let's review the main hooks in the Field API that I covered in the first part of this series:
hook_field_info()tells Drupal about your custom fields.hook_field_widget_info()tells Drupal about your custom field widgets.hook_field_widget_form()tells Drupal the structure of your custom field widget, so that a form can be displayed to the user.hook_field_is_empty()tells Drupal how to tell whether or not the user has entered any data worth saving.
In this part of the tutorial, I'll cover the following hooks:
hook_field_validate()tells Drupal about any errors detected in the submitted data.hook_field_widget_error()tells Drupal how to handle errors detected inhook_field_widget_error().hook_field_formatter_info()tells Drupal about your custom field formatters.hook_field_formatter_view()tells Drupal how to display the data in your field to the user.
Step 5: Create a field validator with hook_field_validate()
Before we get to the field formatter, we should write a field validator so we can be sure that the data entered by the user is good enough to save.
Here's the field validation in action. I selected tofu and sweet potato as toppings for my poutine like so:
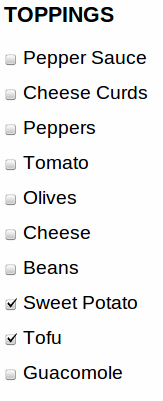
However, that's kind of gross, so I've designed a validator to prevent people from choosing that combination of toppings:

There are two main hooks used to enforce field validation. The first of the two hooks is hook_field_validate(), which simply checks the field's values for errors and sets any error messages in the $errors array.
function poutine_maker_field_validate($entity_type, $entity,
          $field, $instance, $langcode, $items, &$errors) {
  foreach ($items as $delta => $item) {
    if (isset($item['sweet_potato']) &&
        isset($item['tofu']) &&
        $item['sweet_potato'] == 1 &&
        $item['tofu'] == 1) {

      $errors[$field['field_name']][$langcode][$delta][] = array(
        'error' => 'poutine_maker_invalid_full',
        'message' => t(
          '%title: Your poutine is not tasty. '.
          'Please do not mix sweet potato and tofu.',
          array('%title' => $instance['label'])
        ),
      );
    }
  }
}
The code above looks at all the poutines entered in our poutine field, and figures out if any of them have both tofu and sweet potato selected. If so, we set an error called 'poutine_maker_invalid_full' with an error message. The poutine_maker_field_widget_error() function (below) is necessary for this error message to actually be rendered.
The validate() function will communicate with widget_error() using the $errors array. The array includes useful information about the errors in a field widget, such as on which element the error occurred.
Let's take a look at the hook_field_widget_error() code:
function poutine_maker_field_widget_error($element, $error,
                                      $form, &$form_state) {
  switch ($error['error']) {
  // Handle the error that was set in
  // poutine_maker_field_validate()
  case 'poutine_maker_invalid_full':
    form_error($element, $error['message']);
    break;
  }
}
The hook_field_widget_error() function above handles errors differently based on which error is being processed. The switch statement checks what type of error it is. In this case we only have one type of possible error, but I've included the switch statement anyways to illustrate the flexibility. I've set it to handle the 'poutine_maker_invalid_full' error by flagging the form element as having an error.
Step 6: Define your field formatter with hook_field_formatter_info()
hook_field_formatter_info() tells Drupal about the formatters your module makes available. Here's an example:
function poutine_maker_field_formatter_info() {
  return array(
    'poutine_maker_poutine_formatter' => array(
      'label' => t('Default'),
      'field types' => array('poutine_maker_poutine'),
    ),
  );
}
'poutine_maker_poutine_formatter' is the machine-readable name of the field formatter. This is how other hooks can tell what kind of formatter is being used (if, for example, your module defined more than one formatter).
'field types' => array('poutine_maker_poutine') means that this formatter will format only the 'poutine_maker_poutine' field type. If your formatter was fairly generic like a text box, it could work for text fields, date fields, or colour fields.
Now that we've defined a formatter, we can see the choice on the 'Manage Display' tab of our node:

Step 7: Define how your field should be formatted with hook_field_formatter_view()
Now we just need to give the Field API a renderable array to display to the user. I like to have one generic implementation of hook_field_formatter_view() that delegates construction of the array to a separate function. This makes it easy to add formatters.
Here is hook_field_formatter_view():
function poutine_maker_field_formatter_view($entity_type, $entity, $field,
                                  $instance, $langcode, $items, $display) {
  $element = array();
  foreach ($items as $delta => $item) {
    $element[$delta] = poutine_maker_format_field($item);
  }
  return $element;
}
Notice that this function returns an $element array, keyed by $delta (each $delta refers to an item in a multi-value field). I render each element item in a separate function called poutine_maker_format_field(). This is not a hook, but rather a helper function to keep my hook_field_formatter_view() implementation clean and short.
Here is my poutine_maker_format_field() function. It starts out with a 'container' element. This is similar to the Form API's fieldset type.
function poutine_maker_format_field($item) {
  $element = array(
    '#type' => 'container',
    '#attributes' => array( 'class' => array( 'field-item') ),
  );

  // ...
Next, I add the name of the poutine:
$element['name'] = array(
  'label' => array(
    '#type' => 'container',
    '#attributes' => array( 'class' => array( 'field-label' )),
    'text' => array(
      '#markup' => t('Name'),
    ),
  ),
  'item' => array(
    '#type' => 'container',
    '#attributes' => array( 'class' => array( 'field-item') ),
    'text' => array(
      '#markup' => $item['name'],
    ),
  ),
);
Next, I check to see if the poutine is vegetarian. If the poutine is vegetarian, I add a little note that says so:
if ($item['vegetarian']) {
  $element['vegetarian'] = array(
    'item' => array(
      '#type' => 'container',
      '#attributes' => array( 'class' => array( 'field-item') ),
      'text' => array(
        '#markup' => t('<strong>This is a vegetarian poutine</strong>'),
      ),
    ),
  );
}
The only thing left is the ingredients. The simplest output for me is to just list the ingredients in the poutine:
  $toppings_list = array();
  foreach (poutine_maker_toppings() as $topping_machine=>$topping) {
    if ($item[$topping_machine] == 1) {
      $toppings_list[] = t($topping);
    }
  }
  $toppings_rendered_list = implode(', ', $toppings_list);
  $element['toppings'] = array(
    'label' => array(
      '#type' => 'container',
      '#attributes' => array( 'class' => array( 'field-label' )),
      'text' => array(
        '#markup' => t('Ingredients'),
      ),
    ),
    'item' => array(
      '#type' => 'container',
      '#attributes' => array( 'class' => array( 'field-item') ),
      'text' => array(
        '#markup' => $toppings_rendered_list,
      ),
    ),
  );
This code simply creates a comma-separated list of ingredients, and then sticks that list in a div. The Render API arrays are verbose, but it allows you to avoid writing markup.
The only thing left to do is to return the renderable element item. Remember that this is only one item in a multi-value field. This is not a requirement; it is just the way I have organized my code.
  return $element;
}
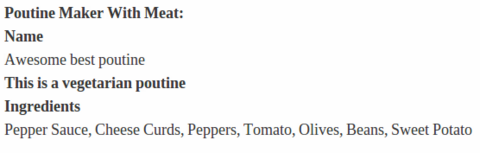
Here is the formatter in action:
A More Advanced Formatter
The basic formatter works, but I wanted to format my field data in an exciting way using the HTML Canvas API. Here's the PHP code that creates the canvas tag:
The first step is to add my Javascript file to the page.
function poutine_maker_format_canvas_field($item) {
  drupal_add_js(drupal_get_path('module', 'poutine_maker') . '/poutine_maker.js');
Next, I create a container for my canvas element:
  $element = array(
    '#type' => 'container',
    '#attributes' => array( 'class' => array( 'field-item') ),
  );
Here's where I create the canvas element itself. I generate a unique ID for it so I can keep track of it.
  $canvas_id = 'poutine_maker_' . md5(rand());
  $canvas = '<canvas width="500" height="500" class="poutine-maker-animation" id="' . $canvas_id . '"></canvas>';
I then create a JSON data array for my Javascript to use. It includes the URLs for the ingredient photos, the title of the poutine, and a few other things. I include the JSON in the page with drupal_add_js().
  foreach (poutine_maker_toppings() as $topping_machine=>$topping) {
    if ($item[$topping_machine] == 1) {
      $toppings_list[] = $topping;
      $toppings_list_img[] = drupal_get_path('module', 'poutine_maker') . '/' . $topping_machine . '.jpg';
    }
  }

  // Give the <canvas> animation some data to work with.
  $json = array(
    'title' => $item['name'],
    'toppings' => $toppings_list_img,
    'bg' => drupal_get_path('module', 'poutine_maker') . '/poutine_background.jpg',
    'vegetarian' => ($item['vegetarian'] == 1),
    'fork' => drupal_get_path('module', 'poutine_maker') . '/fork.png',
  );
  $js = 'window[\'' . $canvas_id . '\'] = ' . json_encode($json) . ';';
  drupal_add_js($js, 'inline');
Finally, I add the canvas to the renderable array, and return the element to be rendered.
  $element['text'] = array (
    '#markup' => $canvas,
  );
  return $element;
}
There's a ton of Javascript involved here that I won't get into. The gist of it is I look for canvases with the '.poutine-maker-animation' class, load the data associated with that canvas element, and run the animation with the included photos.
poutine_maker_field_formatter_view() must be tweaked to support more than one widget type, but I won't include the code here (if you're curious, see the code on github or drupal.org). Here's the updated hook_field_formatter_info(). Note the additional entry.
function poutine_maker_field_formatter_info() {
  return array(
    'poutine_maker_poutine_formatter' => array(
      'label' => t('Default'),
      'field types' => array('poutine_maker_poutine'),
    ),
    'poutine_maker_poutine_canvas' => array(
      'label' => t('Canvas Formatter'),
      'field types' => array('poutine_maker_poutine'),
    ),
  );
}
Review
Here's a review of the entire custom field process:
- Define your custom field with
hook_field_info() - Tell Drupal about your custom field widget with
hook_field_widget_info() - Define your custom field widget with
hook_field_widget_form() - Let Drupal know when your field is empty with
hook_field_is_empty() - Define your custom field validator with
hook_field_validate() - Let Drupal know about your custom field formatter with
hook_field_formatter_info() - Define how your field should be formatted with
hook_field_formatter_view()
The example code covered in this tutorial are available on github and drupal.org. They are heavily commented and cover more material than I could in these posts.
As always, comment if you have questions or suggestions. If you're using custom fields in interesting ways, let us know!
Notes
The Field API hooks that I covered support multiple fields, multiple widgets, and multiple formatters. A good example is the Date module, which defines date, datestamp, and datetime fields. The Date module defines several different widgets for these fields as well: date_text and date_select are two examples. I recommend reading the Date module's code to see a rich example of custom fields types in Drupal.
