In Google Analytics, events help you track user behaviour and better understand your website’s performance.
However, event reporting isn’t the most convenient way to obtain a bigger picture of your traffic and/or content performance. A better method for this is to use goals.
Once you’ve set up goals in GA, you can check on overall performance efficiently and monitor volumes and conversion rates for each goal. This makes it easier to keep track of key metrics, such as your best- and worst-performing traffic sources, landing pages, audiences, etc.
Let’s take a look at how you can convert your Google Analytics events to goals and translate your event tracking into goal reporting.
Events vs. goals: what’s the difference?
Before we get into the method for turning events into goals, we need to start by clearing up an important (and too often, unknown) fact: events and goals aren’t the same thing.
Events are trackable user actions/behaviours such as video views/plays, link clicks, or CTA interactions. In practice, an event can be virtually anything.
Goals, on the other hand, are more limited, and do not require any work in google tag manager (the way to go to create events).
There are 4 goal types:
- Destination: A specific location loads
- Duration: Sessions that last
- Pages/screen per session: A user views a specific number of pages or screens
- Event: An action defined as an Event is triggered
Now that that’s out of the way, let’s learn how to create a goal out of an existing event.
How to turn a Google Analytics event into a goal
Step 1: Set up a custom goal
First, go to the admin section of your Analytics account.
Navigate to the Goals section and create a new goal. In Goal setup, choose the custom option.
Step 2: Select your goal type
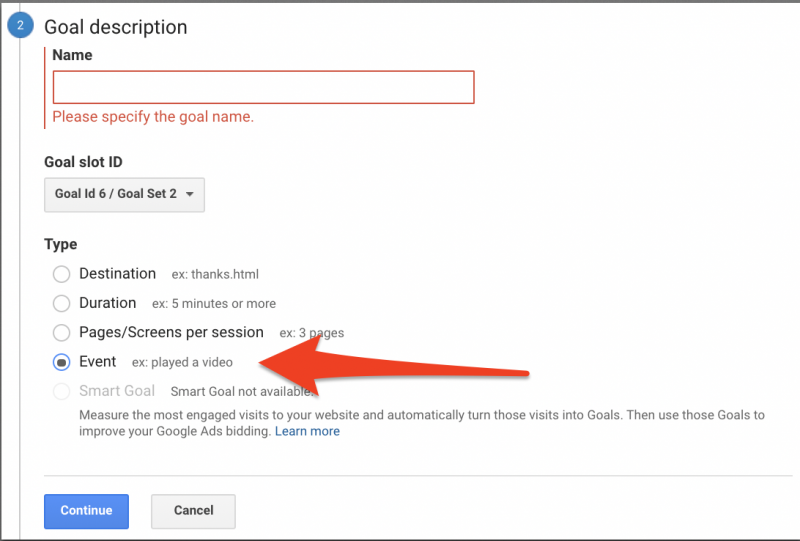
Choose the Event type for your new goal, and give your goal a name.

Keep in mind that you might not be the only person to monitor Google Analytics and user behaviour. Stick to a clear, consistent naming convention so that your teammates and/or clients are able to understand what the goal is. The goal name you choose here is what will be displayed on your reports.
Step 3: Configure your goal with the event’s details
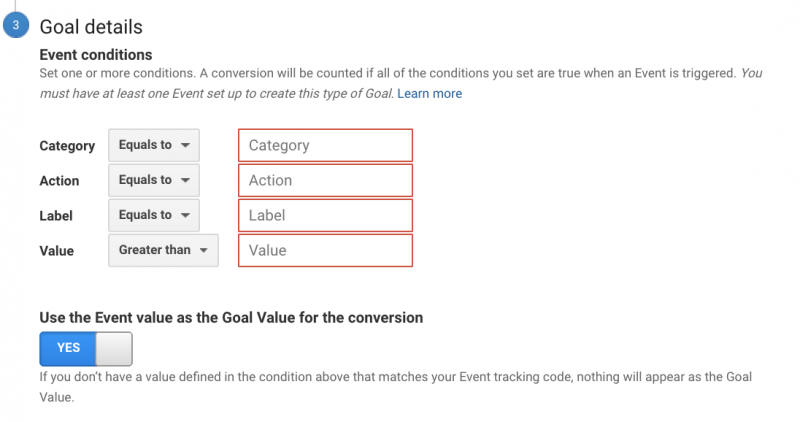
This is where you need to match your event’s variables to your goal’s.
Go to Events > Overview, find the event you wish to turn into a goal, and copy-paste its variables into the Goal details.

The Value field is optional. You can assign one if you have a fair idea of your goal’s values. You need to specify at least one event condition. Note that you need to align this configuration (“goal details”) to your event (the event you aim to turn into a goal) variables.

The above are the variables you can copy paste in your goal details.
Step 4: Determine your goal’s action
For this step, we’ll follow a simple scenario. Let’s say you want to turn a specific form submission event into a goal.

In this case, the Event Category should be equal to “Form Submission” (you can copy-paste to avoid misspellings).
When you click on Form Submission under Event Category, it will redirect you to the Top Events report, which shows you what action is associated to the event.

In this case, it’s Click. This will become your Goal Action.
Step 5: Identify and apply the label (if necessary)
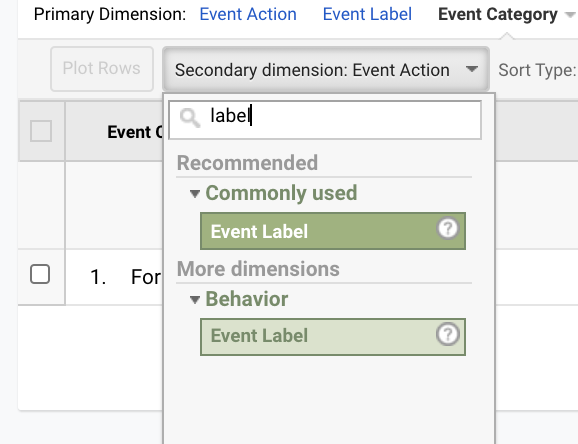
You might also have a specific label applied to your source event. By switching dimensions in your Top Events report, you can identify the label.

Choose the label applied to your specific event.

You can now copy-paste this event label in your goal details.
Step 6: Verify your goal
Last step of the whole process is to verify the goal.

It is possible you recorded zero goals (you can double check in the events report). But if you generated any, your verification should output a goal conversion rate above 0.

You can now save your goal and monitor its performance via the Acquisition and Conversions tabs.

