Update: You can now watch a video of my presentation on this topic at DrupalCamp Montreal 2011 here (.mp4).
The power of Drupal stems from our ability to customize it. One common requirement is the need to define complex fields with custom widgets and formatters that are unavailable in core or contributed modules. This allows us to collect more sophisticated data from users, and define exactly how that data is presented. Drupal's Field API provides the hooks needed to make just about any field we want.
What Problems Are We Solving?
The top reasons for wanting to make a custom field are:
- To customize the way a user inputs their data. This is done with a custom field widget.
- To customize the way a field is displayed. This is done with a custom field formatter.
- To create a complex multi-value fieldset. Currently there is no way to do this in Drupal. By defining a custom field and setting the "Number of values" setting to "Unlimited", we can use one field to store many complex values.
In this post, I'll start by covering the first item: custom field widgets. But first let's take a look at the main hooks I'll cover in this series.
Field API Hooks
hook_field_info()tells Drupal about your custom fields.hook_field_widget_info()tells Drupal about your custom field widgets.hook_field_widget_form()tells Drupal the structure of your custom field widget, so that a form can be displayed to the user.hook_field_is_empty()tells Drupal how to tell whether or not the user has entered any data worth saving.hook_field_validate()tells Drupal about any errors detected in the submitted data.hook_field_formatter_info()tells Drupal about your custom field formatters.hook_field_formatter_view()tells Drupal how to display the data in your field to the user.
The Challenge
Those who don't live in Canada may not be familiar with the best thing Montreal has to offer: poutine. Poutine is the delicious but harmful combination of French fries, cheese curds, and copious amounts of gravy. Those who live outside Quebec may not even be aware of the stuff Montrealers put in their poutine: I've seen anything from lobster to smoked meat to avocado in poutine.
With the recent startup craze, I figured I'd hop on the bandwagon and start my own Poutine web startup. On my company's Drupal site, I wanted to let my hired bloggers blog about new poutine creations my chefs concocted. What I needed was a custom field.
And poutine_maker.module was born.
Step 1: Define your field type with hook_field_info()
First, you need to tell Drupal that you are defining your own field type. You can also define new widgets and formatters for existing field types, but in this example we want to add a brand new field type called 'poutine creation'.
Here is how you define a field type:
function poutine_maker_field_info() {
  return array(
    'poutine_maker_poutine' => array(
      'label' => t('Custom Poutine'),
      'description' => t('Custom Poutine Field'),
      'default_widget' => 'poutine_maker_poutine_widget',
      'default_formatter' => 'poutine_maker_poutine_formatter',
    ),
  );
}
Note that poutine_maker_poutine is the machine-readable name of the field. The convention is to name it in the form <modulename>_<fieldname>. In this example, poutine_maker is the module name and poutine is the field name.
Pay close attention to the default_widget and default_formatter values. We will use these machine-readable widget and formatter names throughout the module.
Step 2: Tell Drupal about your field widget with hook_field_widget_info()
Next, we need to tell Drupal about your custom widget. This will tell Drupal to add your field to the list of possible field types on the Manage Fields tab of each fieldable entity (e.g. each content type). This will allow users to make use of your field, like this:

Here's the code:
function poutine_maker_field_widget_info() {
  return array(
    'poutine_maker_poutine_widget' => array(
      'label' => t('Default'),
      'field types' => array('poutine_maker_poutine'),
    ),
  );
}
Remember poutine_maker_poutine_widget? That's the full machine-readable widget name. The convention is <modulename>_<fieldname>_<widgetname>. In this case, the widget name is 'widget'. I intend to make only one widget for this field, but if you're using multiple widgets, you'll need to come up with descriptive widget names for each option. If one of your widgets includes autocomplete input items, you could name it poutine_maker_poutine_autocomplete.
Also note that I am specifically telling Drupal that my widget can work with the poutine_maker_poutine field type. If you want to use the same widget for multiple field types, you could specify those field types here, by adding them to the field_types array.
Step 3: Tell Drupal how to display your widget with hook_field_widget_form()
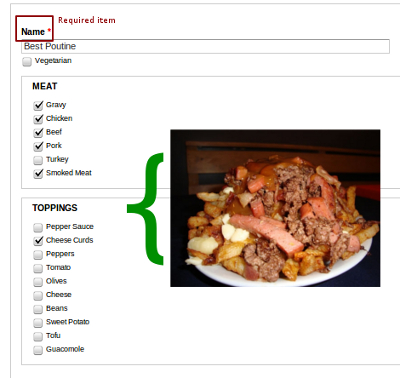
Next, I'll talk about how to create the form widget that gets displayed to users who are actually entering data into the field. This is how I want the form element to appear to customers ordering their poutine:
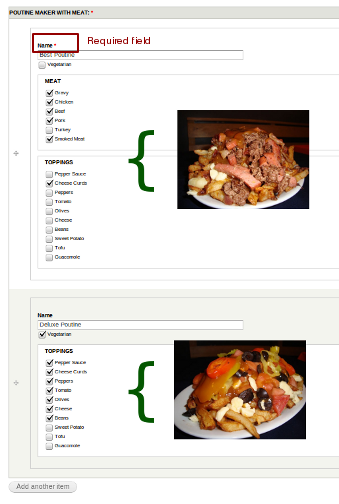
There are three important things to notice about this screenshot:
- There are two poutine items! This is done by setting the number of values to "Unlimited" on the field instance settings page. Now this field can store as many poutines in one field as we like.
- The entire field ("Poutine Maker With Meat") is marked as required, but only the "name" sub-element is actually required. I will explain how this works in a bit. In addition, note that the name is only required in the first poutine item. This is Drupal's default behaviour for multivalued fields with an unlimited number of values.
- The second poutine item doesn't have a "Meat" fieldset, because the 'Vegetarian' checkbox is checked. This is done with #states. I will cover #states in the next part of this tutorial.
I implemented the widget shown in the above screenshot by implementing hook_field_widget_form(). Let's take a look at the function signature of my implementation, poutine_maker_field_widget_form():
function poutine_maker_field_widget_form(&$form,
                                         &$form_state,
                                         $field,
                                         $instance,
                                         $langcode,
                                         $items,
                                         $delta,
                                         $element)
There are a lot of parameters that are covered in the documentation, so I'll just cover the important ones:
$itemsstores the data entered by the user. It is an array of$itemarrays, keyed by each item's $delta. If you have a multi-value field instance, there will be more than one item; if your field instance has just one value, then there will be one item with the key 0.-
$element<code> is the value this function will return. It uses the <a href="http://api.drupal.org/api/drupal/developer--topics--forms_api_reference.html/7">Form API</a>'s form definition structure, so it will probably look familiar to you. It is passed to <span style='font-family:"Courier New","DejaVu Sans Mono", monospace'>poutine_maker_field_widget_form()</span> with some existing values documented <a href="http://api.drupal.org/api/drupal/modules--field--field.api.php/function/hook_field_widget_form/7">here</a>, so make sure you don't overwrite it.</li>
</ul>

<h3>Creating a Fieldset</h3>

<p>For my poutine field, I want a bunch of sub-elements for name, toppings, etc., so I will make <code>$element
a fieldset:
$element += array(
  '#type' => 'fieldset',
);
Adding a Name Field
Next, I want to add a name field so customers can name their poutine creations:
$required = $element['#required'];
$item =& $items[$delta];

$element['name'] = array(
  '#title' => t('Name'),
  '#type' => 'textfield',
  '#required' => $required,
  // use #default_value to prepopulate the element
  // with the current saved value
  '#default_value' => isset($item['name']) ? $item['name'] : '',
);
All of these keys should look familiar if you've used the Form API before (see the reference if they don't). Just note that we're using $item to set the default value. Since $item is just the data stored by the form, this pre-fills the element with whatever the current value is -- if one has been set. Drupal will automatically map the value of $element['name'] to $item['name'], but this isn't always the case, as we'll see when we create nested fieldsets.
Vegetarian Option
Here is a checkbox for informing the chef that you are vegetarian:
$element['vegetarian'] = array(
  '#title' => t('Vegetarian'),
  '#type' => 'checkbox',
  '#default_value' => isset($item['vegetarian']) ? $item['vegetarian'] : '',
);
Adding the Meat!
Poutine puritans will be horrified (and others may just feel a trembling in their arteries), but here is a fieldset with a few meats to choose from:
$process = array_merge($fieldset_info['#process'], array('poutine_maker_ignore_parent'));

$element['meat'] = array(
  '#title' => t('Meat'),
  '#type' => 'fieldset',
  '#process' => $process,
);

// Create a checkbox item for each meat on the menu.
// poutine_maker_toppings_meat() returns an associative array of all the meats I want available
// (see the example module)
foreach (poutine_maker_toppings_meat() as $meat_machine=>$meat) {
  $element['meat'][$meat_machine] = array(
    '#title' => t($meat),
    '#type' => 'checkbox',
    '#default_value' => isset($item[$meat_machine]) ? $item[$meat_machine] : '',
  );
}
You'll notice that I added a #process key to the fieldset. This is because the 'meat' fieldset is nested within another fieldset (the $element fieldset). Drupal doesn't know automatically how to map $form values to $item values when they are within fieldsets, so I've added a #process callback to fix this. I will explain this in greater detail later.
Other Toppings
In the full version of the poutine_maker example module I wrote for this post, I also include a $element['toppings'] fieldset the same way, which is a separate fieldset for non-meat toppings.
As an exercise, add a toppings element to your field, which would allow customers to choose which vegetarian toppings they want on their poutine creation.
Step 3: Tell Drupal how to tell when your field is empty with hook_field_is_empty()
After a user enters some values into your custom field and hits 'submit', we want Drupal to validate and then save the entered data. However, before Drupal will validate the fields, it checks to see if the fields are empty. If they are, it won't try to validate or save anything. In order to let Drupal know whether or not values have been submitted, we'll need to implement hook_field_is_empty().
In the following example, I first check to see if any of the checkboxes have been checked off, and then check to see if the user has entered a name. If any of these conditions are satisfied, I consider the field non-empty. This doesn't mean that the field will validate, but that it should be run through validation.
function poutine_maker_field_is_empty($item, $field) {
  $has_stuff = FALSE;

  // first see if any of the topping checkboxes have been checked off
  foreach (poutine_maker_toppings() as $topping_machine=>$topping) {
    if (isset($item[$topping_machine]) && $item[$topping_machine] == 1) {
      $has_stuff = TRUE;
    }
  }

  // has the user checked off the 'vegetarian' checkbox?
  if (isset($item['vegetarian']) && $item['vegetarian'] == 1) {
    $has_stuff = TRUE;
  }

  // has the user entered a name?
  if (!empty($item['name'])) {
    $has_stuff = TRUE;
  }
  return !$has_stuff;
}
This hook is easy to get wrong. If poutine_maker_field_is_empty() ever returns true when it should be false, the entered values will just be ignored. You are no doubt smarter than me, but if you ever notice that your values aren't saving, check your hook_field_is_empty() implementation.
Step 4: Tell Drupal how to store your values with hook_field_schema()
Collecting data from users is great, but we also need to define how Drupal will store this data. hook_field_schema() defines table columns specifically for saving your field values. Whereas hook_schema() will define a table and its fields, hook_field_schema() will only need to define its columns, since the Field API will make a table for each field instance of a custom field. You can learn more about Drupal's Schema API here.
In poutine_maker.install:
function poutine_maker_field_schema($field) {
  // include poutine_maker.toppings.inc for poutine_maker_toppings()
  module_load_include('inc', 'poutine_maker', 'poutine_maker.toppings');

  $columns = array(
    'name' => array('type' => 'varchar', 'length' => 255, 'not null' => TRUE),
    'vegetarian' => array('type' => 'int', 'length' => 1, 'not null' => FALSE),
  );

  // poutine_maker_toppings() returns all the toppings;
  // make a column for each topping
  foreach (poutine_maker_toppings() as $topping_machine=>$topping) {
    $columns[$topping_machine] = array(
      'type' => 'int',
      'length' => 1,
      'not null' => FALSE,
    );
  }
  return array(
    'columns' => $columns,
    'indexes' => array(),
  );
}
Each sub-element we defined in hook_widget_form() has a column in this table. Notice that there is nothing that resembles a fieldset. This should not surprise you if you have used databases before, but it is useful to know why we need to use a special #process callback to 'flatten' the form values.
Step 5: Generate an instance of your new field!
Now that you've created your first custom field, it's time to see it in action. I like to test custom fields by attaching my field to a simple node like a Basic Page (Structure -> Content Types -> Basic Page -> Manage Fields).
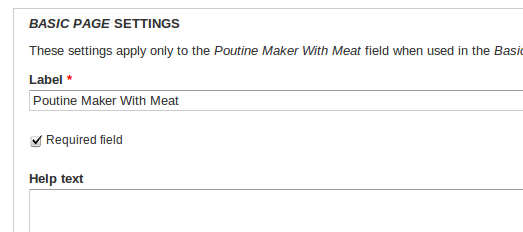
Once you click "Save", it will ask you to configure your field:
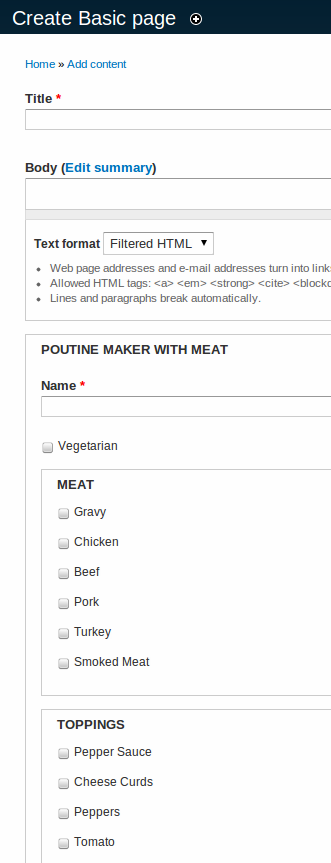
Now when I add a new Basic Page (Content -> Add content -> Basic Page), my field is attached to the form (this time I have set number of items to 1):
The fieldsets #process trick
I promised to explain the #process trick I used. Here's where I tell the Form API about my process callback:
$process = array_merge($fieldset_info['#process'], array('poutine_maker_ignore_parent'));

$element['meat'] = array(
  '#title' => t('Meat'),
  '#type' => 'fieldset',
  '#process' => $process,
);
The array_merge is just to preserve the current #process callbacks. Here is the callback itself:
function poutine_maker_ignore_parent(&$form, &$form_state, $complete) {
  array_pop($form['#parents']);
  return $form;
}
What does this do? Before I answer this question, let's take a look at a few keys of $form. In this case, $form is the 'meat' fieldset, to which we added the #process callback:
$form = array(
  ...
  '#array_parents' => array('field_poutine_meat', 'und', 0, 'meat'),
  '#parents' => array('field_poutine_meat', 'und', 0, 'meat'),
  ...
);
#parents and #array_parents are identical, except in how they are used. #array_parents is for internal use, and shouldn't be touched. #parents, on the other hand, is the array that the Field API uses to determine the structure of $items, which it uses to save the values in the database.
Our #process callback removes the last value from the #parents array. That's 'meat', which is the name of the fieldset (the same key we used in $element). If we remove that key from #parents, then all the elements under $element['meat'] will be saved into $item, not $item['meat'] (e.g. $element['meat']['chicken'] would be saved into $item['chicken'] instead of $item['meat']['chicken']). This will ensure that the values of the meat checkboxes will be saved properly into the database.
Summary
To create your own custom field:
- Tell Drupal about your field with hook_field_info().
- Tell Drupal about your widget with hook_field_widget_info().
- Tell Drupal about the structure of your widget form with hook_field_widget_form().
- Define a schema that Drupal will use to save the submitted values.
Next Steps
Next I will cover validation and formatting of custom fields. This is what you need to do to make sure your field stores only valid data, and to display the stored data in a useful fashion.
See poutine_maker on GitHub for a full example. It is also now available on Drupal.org as a sandbox project. And, as always, let me know if you have questions and I'll try my best to answer them. Even if you don't have questions, let us know what you're using custom fields for!
Additional Resources
